lemon zest cookies

These super easy cookies are a tangy delicious treat, and a great addition to the kids lunch.  Gluten-free and and naturally sweetened, they are a cinch to make and can be enjoyed baked or raw.

ingredients

  • 1-1/3 cups almond flour
  • 1 cup unsweetened coconut
  • zest of one lemon
  • pinch of sea salt
  • 3 tablespoons raw honey or maple syrup
  • 2 tablespoons coconut oil
  • 2 tablespoons fresh lemon juice
  • 1 teaspoon vanilla extract
  • extra coconut for rolling

preparation

Mix all ingredients in food processor and blend until a paste forms.  Scoop out dough and shape into balls about one inch in diameter.  Place on parchment lined cookie sheet.

You can eat them as is, or bake in 250F oven for twenty minutes.  Makes about 30 little cookies.

Note: Raw honey should never be given to infants as they lack sufficient stomach acid to combat the possibility of bacteria.


IMG_0371


Lenten Greek Bean Salad – Fassolia Salata

IMG_0313

“But unless humility, simplicity, and goodness adorn our lives, and are associated with prayer, the mere formality of prayer will avail us nothing. And this I say, not of prayer only, but of every other outward exercise or labor undertaken with a notion of virtue.” —Saint Macarius


Lenten menus tend to feature beans…. lots and lots of beans.

We have two favorite local Greek restaurants, The Plaka and Nostos.  For any locals, this dish is inspired by our local Greek Restaurant in Tyson’s…. Nostos which has a wonderful menu with some very traditional dishes, way beyond gyros and souvlaki.   The recipe below is modified from the one found in Foods of the Greek Islands, by Aglaia Kremezi, which is more of a salad with a dijon mayonnaise base than this version.

In every recipe in which you use dried beans, take the time to soak them- either in plain water or even better, with a tablespoon of apple cider vinegar added to the the beans and water.  That this is similar to the traditional methods your grandmother or great-grandmother might have done.  They knew a thing or two about cooking and those traditions, well…they lend to maximum digestibility and nutrition.

Traditional peoples whose cuisines were based on legumes prepared them with great care.  Beans are soaked for long periods before they are cooked – some varieties in acidic water and some in neutral or slightly alkaline water.  The soaking water is poured off, the beans are rinsed.  As the beans cook, all foam that rises to the top of the water is skimmed off.  Such care and preparation in cooking ensures that the beans will be thoroughly digestible and all the nutrients they provide well assimilated, because such careful preparation neutralizes phytic acid and enzyme inhibitors and breaks down complex-sugars. (Nourishing Traditions)

How did they know this without nutrition fact panels?  One reason might be that at that time their food supply had not become so laden with toxic and artificial chemical ingredients and sugars – so our ancestors actually knew how foods made them feel on a more subtle level than do we.  They had a cleaner more pure food supply, so their bodies – not having the daily nutritional noise and non or even anti-nutrition -coursing through them -knew when something didn’t sit right.  We, on the other hand, are fairly used to not feeling nourished, so it just goes unnoticed.

Soaking also allows the beans to be more agreeable in other ways (if you get my drift!) because it helps break down some of the more complex sugars which are gas causing.

Especially for those larger kidney, northern whites, chickpeas and black eyed peas, a good soak is in order.  Soaking your beans does the beans and yourself a favor.  First of all, dried beans are a fraction of the price of those canned, so in big families this is a budgetary boon.  Further – the soaking neutralizes phytates and enzyme inhibitors that bind the nutrition of the bean, such that we can not absorb it… in some cases, large amounts of phytates can bind to the minerals in the rest of our meal and making them unavailable.

One other note- canned beans do not offer the same benefits as soaking.  Canned beans are high in sodium are canned under very high pressures.  This does not neutralize phytates and the danger is that such processing denatures proteins and other nutrients at the same time.  We do use canned beans in a pinch, but sparingly.


Ingredients:

2 cups dried white beans (great northern work well), soaked over night and drained

1/2 cup finely diced shallots, red onion or spring onions

1/3 cup chopped flat leaf parsely

1 garlic clove minced

3-4 tablespoons lemon juice

salt and pepper to taste

optional: 1/4 cup olive oil


Preparation:

Place beans in large pot with cold water covering them by 2-3 inches.  Bring to a boil, reduce heat to low and simmer for about one hour or until tender.

Combine the beans and remaining ingredients in a large bowl.  Stir well and let sit for the flavors to combine (about 1 hour).


Serve as a side dish to your favorite meal.


sauerkraut

Farm Fresh Cabbages

“I have come to the conclusion that the most important element in human life is faith.  If God were to take away all the blessings, health, physical fitness,  wealth, intelligence, and leave me with but one gift, I would ask for faith— for with faith in God, in God’s goodness, mercy, love for me, and belief in everlasting life, I believe I could still be happy, trustful, leaving all to God’s inscrutable providence.” —Rose Kennedy


Most people would agree that we live in a germ-ophobic country.  YET, all around us and within us there is a microscopic world, things invisible – an interconnected multitude of fungus and bacteria.  (uh-oh…)  From the beginnings we coexisted with these little organisms; we even harnessed their help to age and preserve our food without refrigeration.  However, when Louis Pasteur uncovered the role of bacteria in disease, (which is a great thing!) we began to fear them as dangerous enemies and in fearing them we forgot about their role in health.

Not all bacteria and fungi are bad.

In our modern antiseptic world, it can take a leap of faith – and maybe even a little science – to calm our fears, reacquaint ourselves and get comfortable with the microcosmos around and within us.  A little reminder that the world God created is good  (it was also raw and unpasteurized, by the way!) and that I can rely on that whole food creation -more than food scientists and industry- for the plentiful nourishment of my family!   You know what?  So can YOU!

The word sauerkraut is German for “sour cabbage” – but the French call it choucroute.  Whatever you call it, sauerkraut is probably to most widely known fermented food behind, pickles, olives and yogurt.

Probably the most widely known sauerkraut is Bavarian style, which is shredded cabbage, salt and seasoned with caraway seeds.  Some other German styles use juniper berries to season the kraut.


A word on the nutritional virtues of sauerkraut.


Fermented sauerkraut is not only pre-gested thereby making it’s nutritional profile more bioavailable, it is also low in calories, high in fiber, and is a good source of vitamins K, C and folate and also the minerals potassium, calcium, magnesium, copper, manganese and iron.  It has a great profile of antioxidants and is anti-inflammatory.  Cabbage is exceedingly nutritious on it’s own merits, but let it ferment and it’s full potential is silently revealed.

Studies that “analyzed cabbage before and after fermentation to see how the elements had changed  found that the glucosinolates in cabbage dissolved into a class of enzymes that have been shown in prior studies to prevent cancer.” (Preventdisease.com)

But that’s not all!  Sauerkraut also helps to maintain the acid/base balance of the body, helps to regulate blood sugar levels making it useful for hypoglycemics and diabetics and has been associated with preserving ocular health.

Like all ferments, sauerkraut  is high in naturally occurring lactic acid which helps maintain a healthy acidity in the large intestine, thus creating an environment that is hostile to parasites  and yeast but comfortable for good bacteria.


Ready to give it a try?


Fermentation takes neither much time, or effort.  It’s a great way to add great nutrition to the table, and making it yourself is a real money saver when you’re on a budget and feeding a large family.

It’s super nourishing, unassuming and delicious.  We eat it because it tastes great.  On it’s own, adorning a brat or hot dog, or even as a great garnish on a wintery day’s BLT.  You can buy sauerkraut in the store, but if you want all the benefits of the ferment, then it’s best to look for small batch, artisinal, organic, lacto-fermented varieties that are also non-pastuerized.


IMG_0306


Michael Pollan says about fermenting, “Koreans, who know a thing or two about fermentation, distinguish between the “tongue taste” of various foods and the “hand taste“.  Tongue taste is a simple matter of molecules making contact with taste buds – the kind of cheap and easy flavors any food scientist or food corporation can produce.  Hand taste is the far more complex experience of a food that bears the indelible mark – the care and sometimes even the love – of the person who made it.  The sauerkraut (and most anything else) you make yourself will have hand taste.

That makes a lot of sense here at Nourishing Grace, because the word nourish is quite beautiful and comes from the latin nutrire, which means to feed or cherish, to preserve, look after or suckle. That implies a “hands on” relationship!


“Better is a dish of herbs where love is than a fattened ox and hatred with it.” —Proverbs 15: 17


Of all our nourishment let it be rooted in goodness and love as we prepare and enjoy our meals with loved ones at the table!


how to make your own sauerkraut

Equipment

1 – 1 gallon Ceramic crock or  wide mouth mason jar

plate or plastic that will fit inside


ingredients for sauerkraut

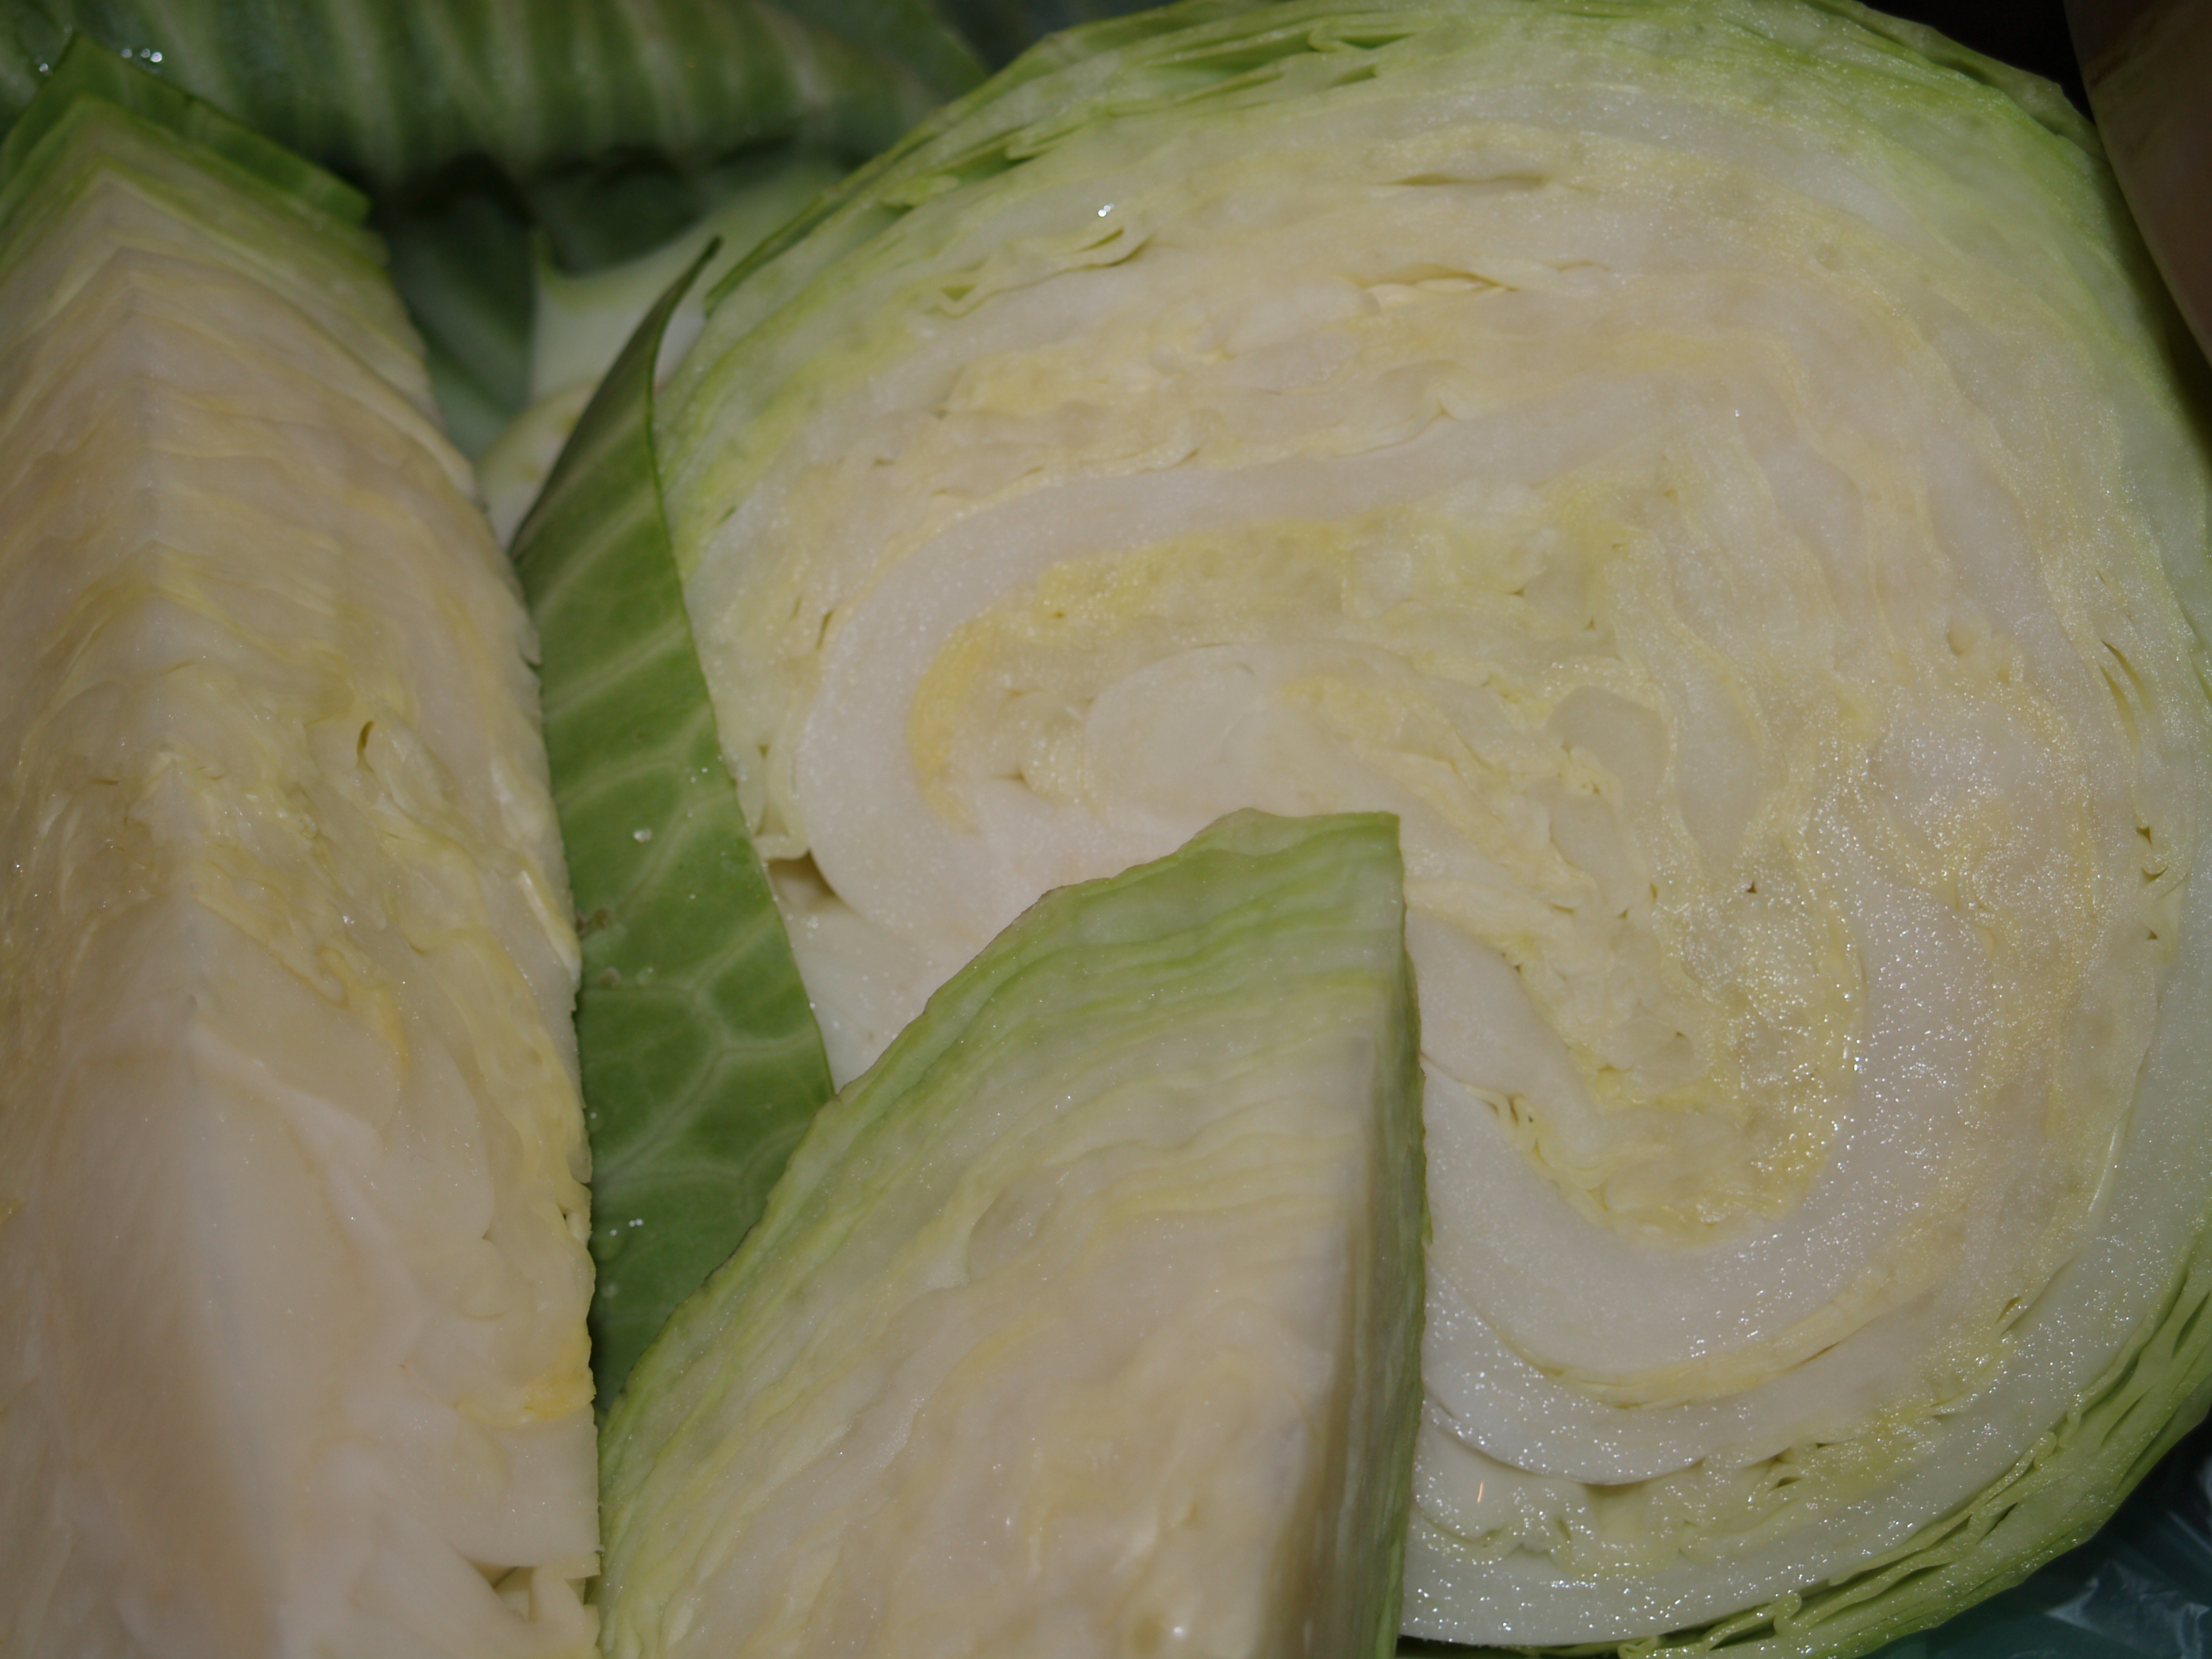
2 medium heads fresh cabbage (fresh local cabbage is the best because of it’s higher moisture content the salt will draw out more water for the brine.

3 tablespoons sea salt


process

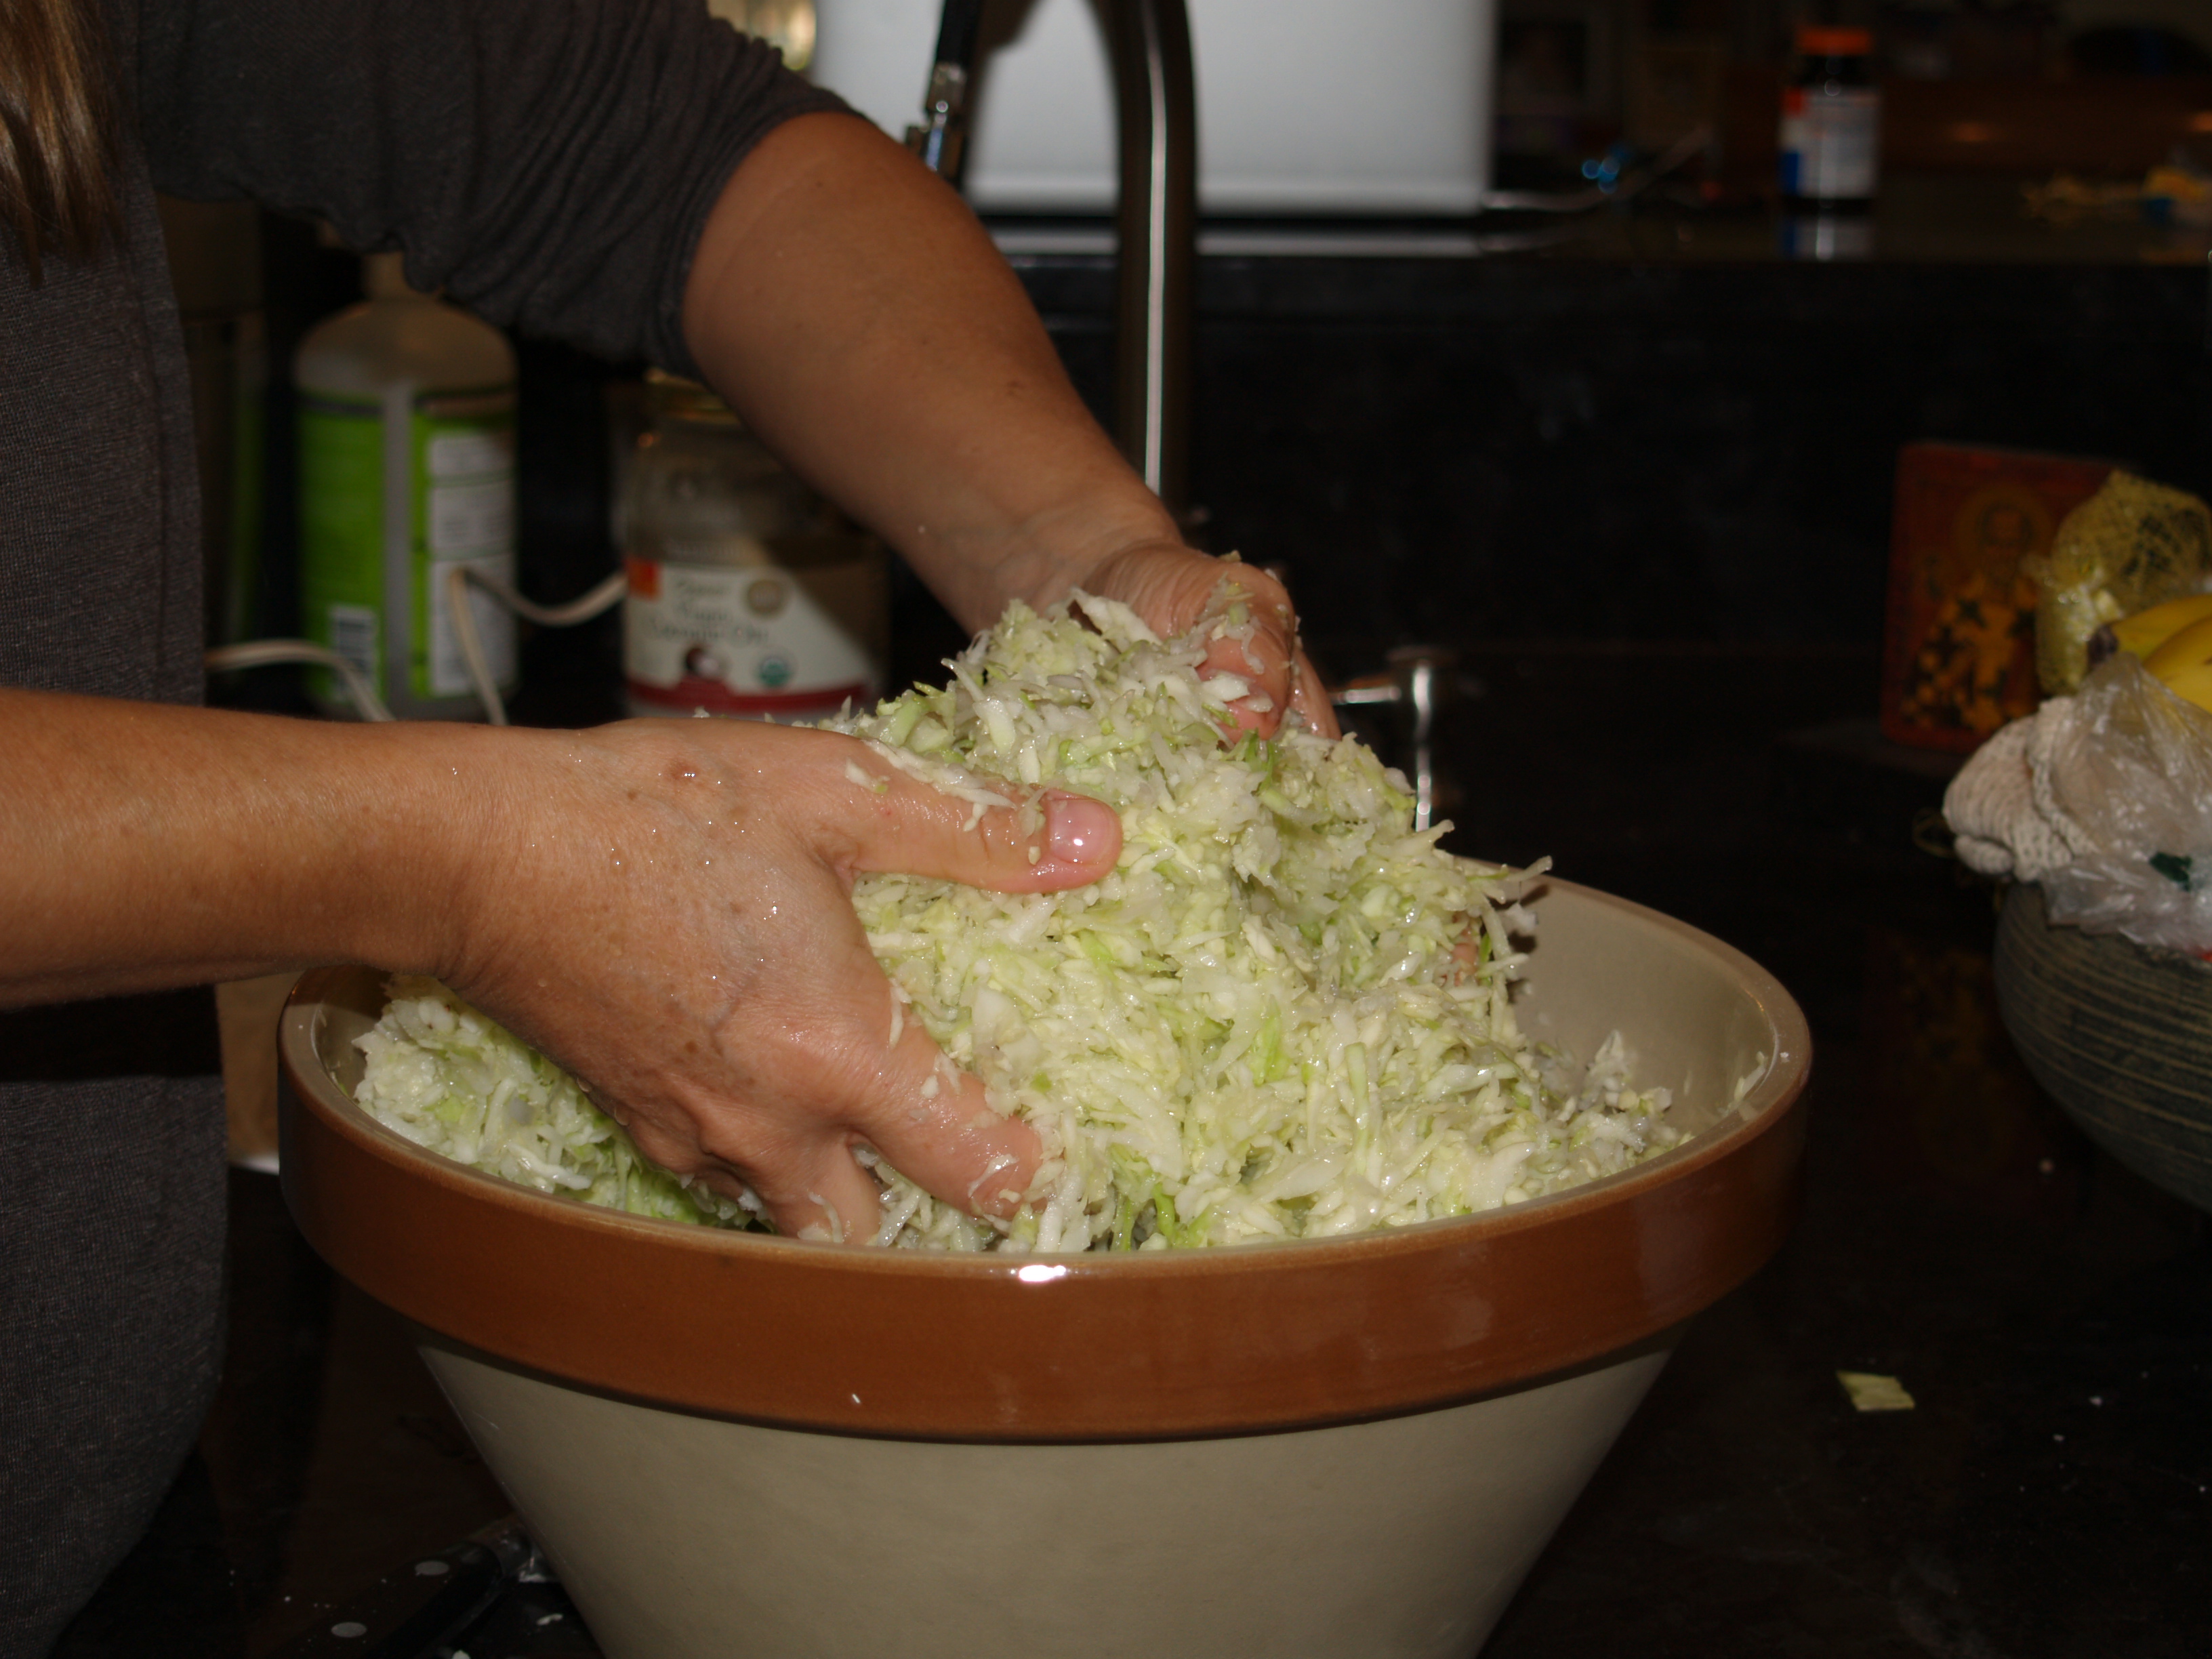
chop or shred the cabbage.  We use a food processor

As you process the cabbage, place in bowl and sprinkle salt on each layer.  The salt osmotically draws the water out of the cabbage.  This becomes the brine in which the cabbage ferments without rotting.

mixing the sauerkraut

mixing the sauerkraut


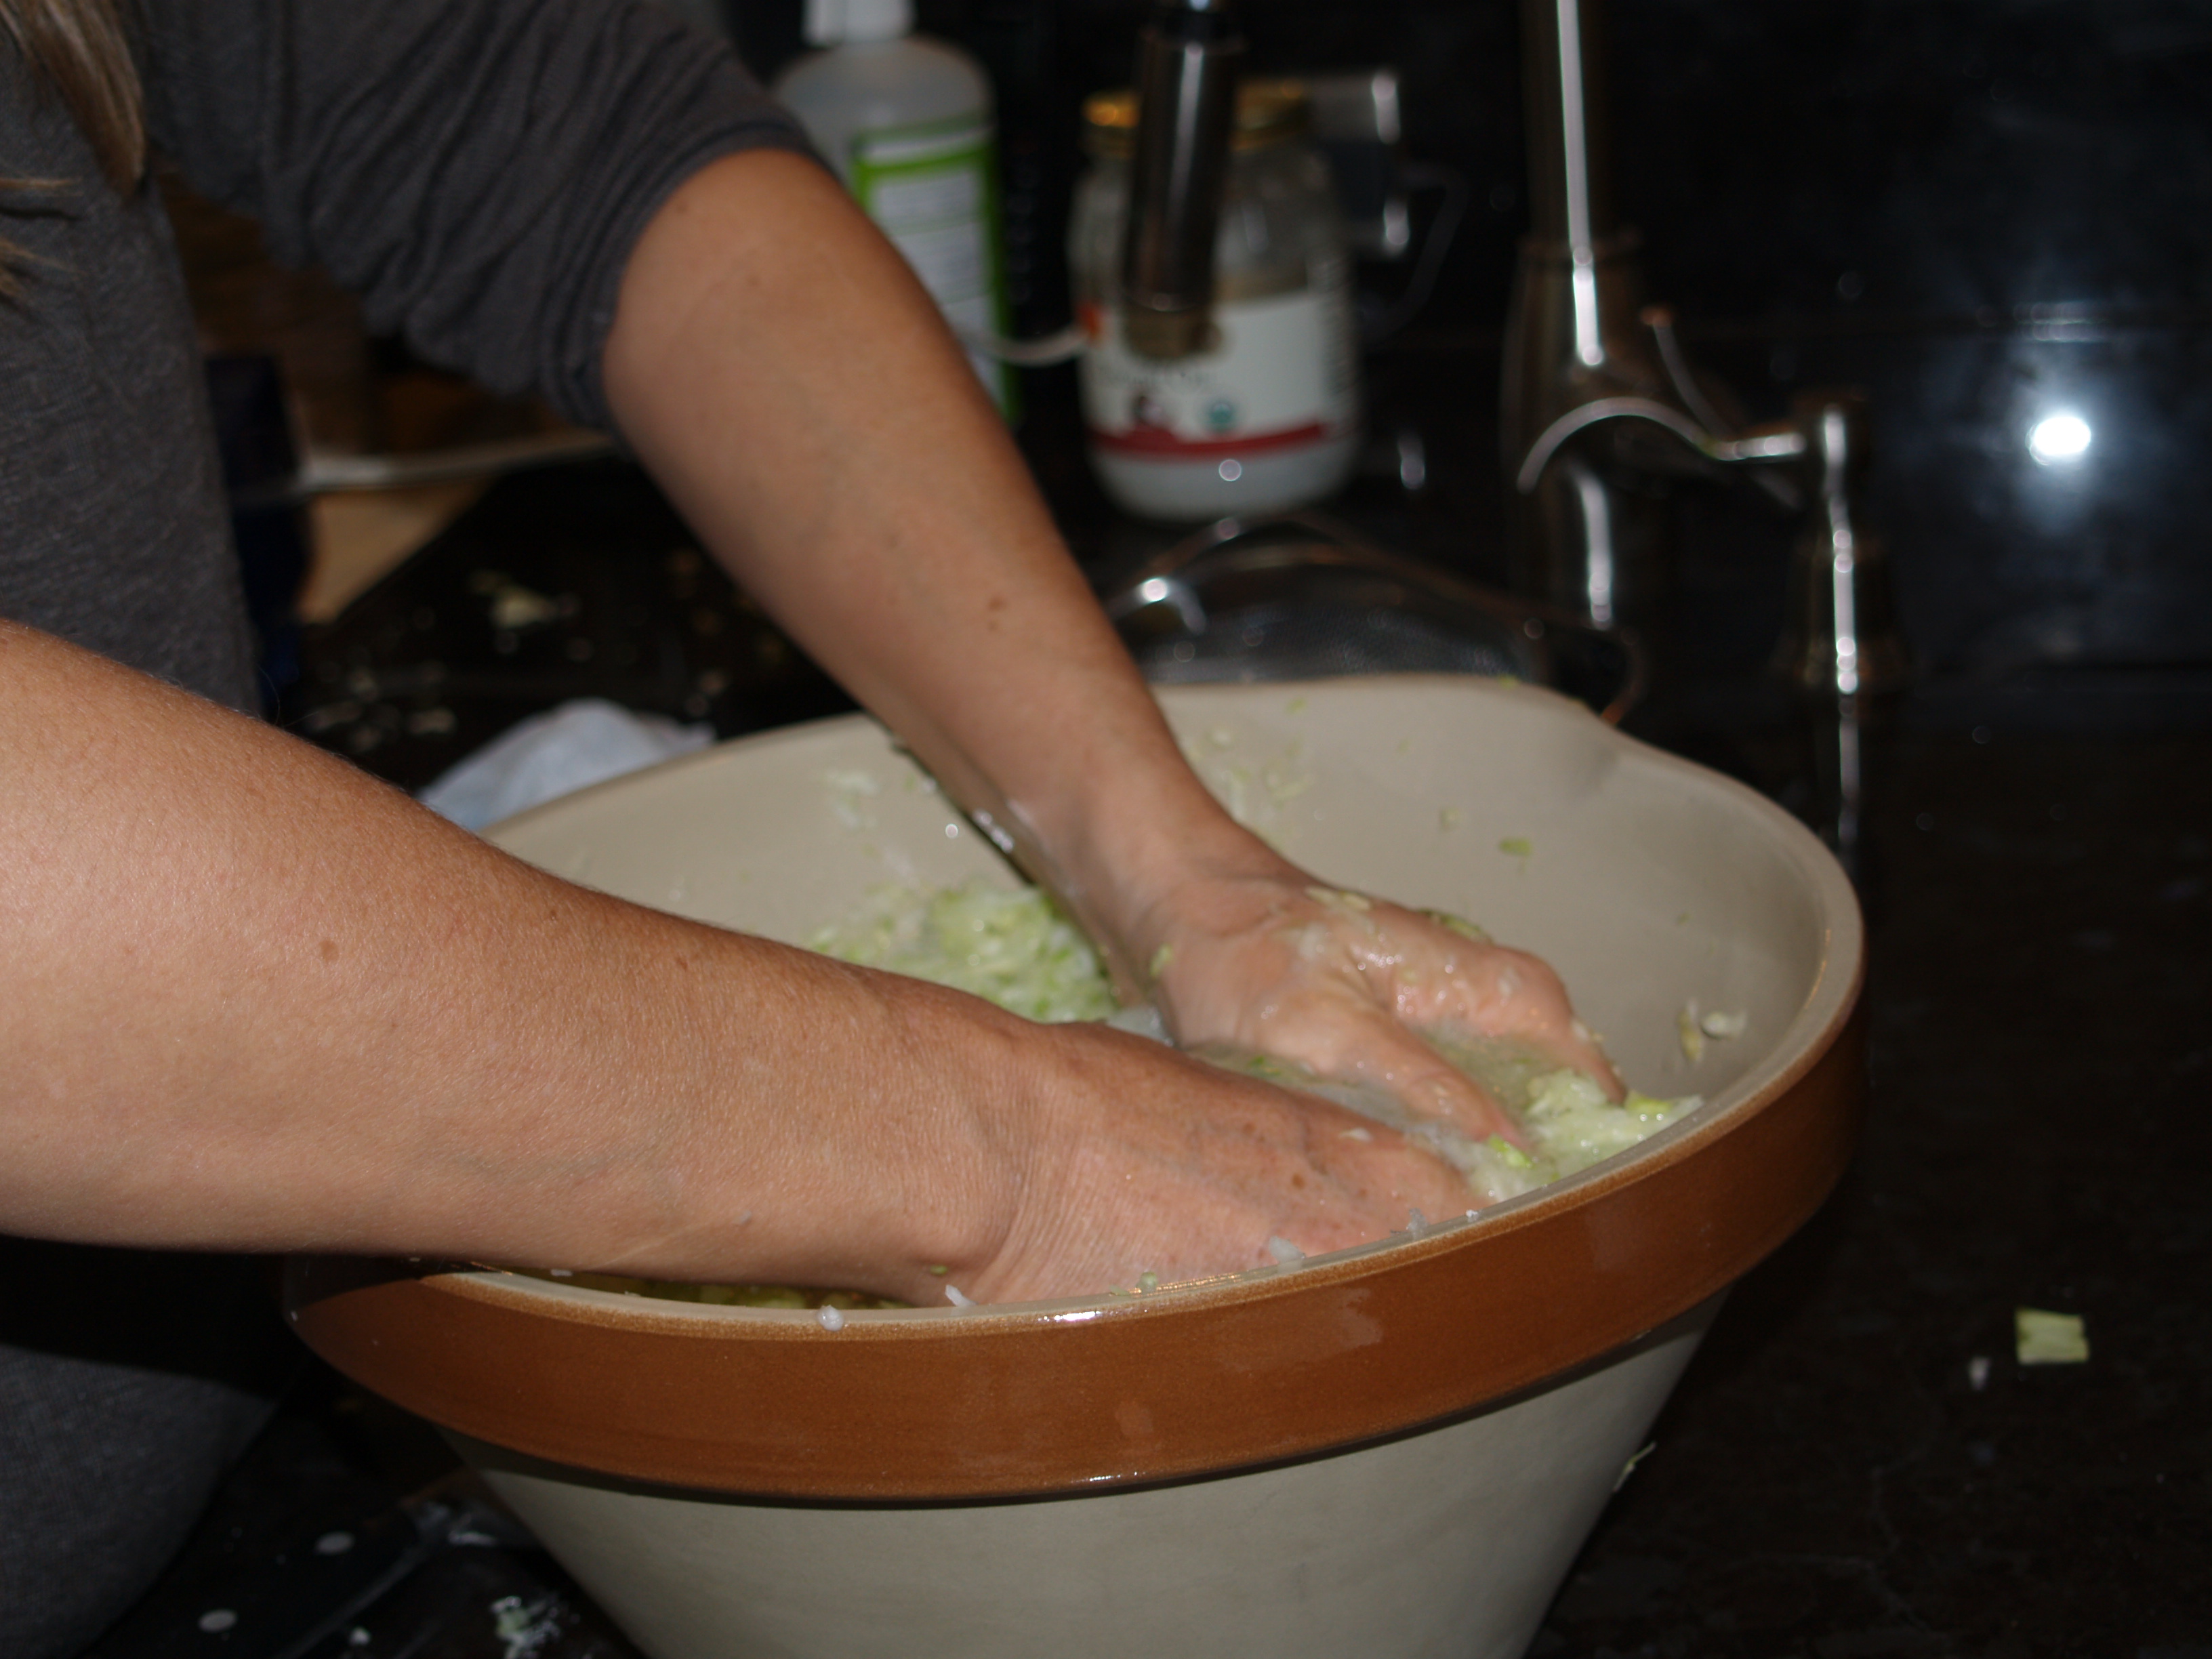
Mix the ingredients together and you can either pound the cabbage, or massage with good firm squeezing.  That will all serve to draw out the brine.  You can also mix it and leave it for a half an hour and then start the pounding or massaging.


massaging the cabbage

massaging the cabbage


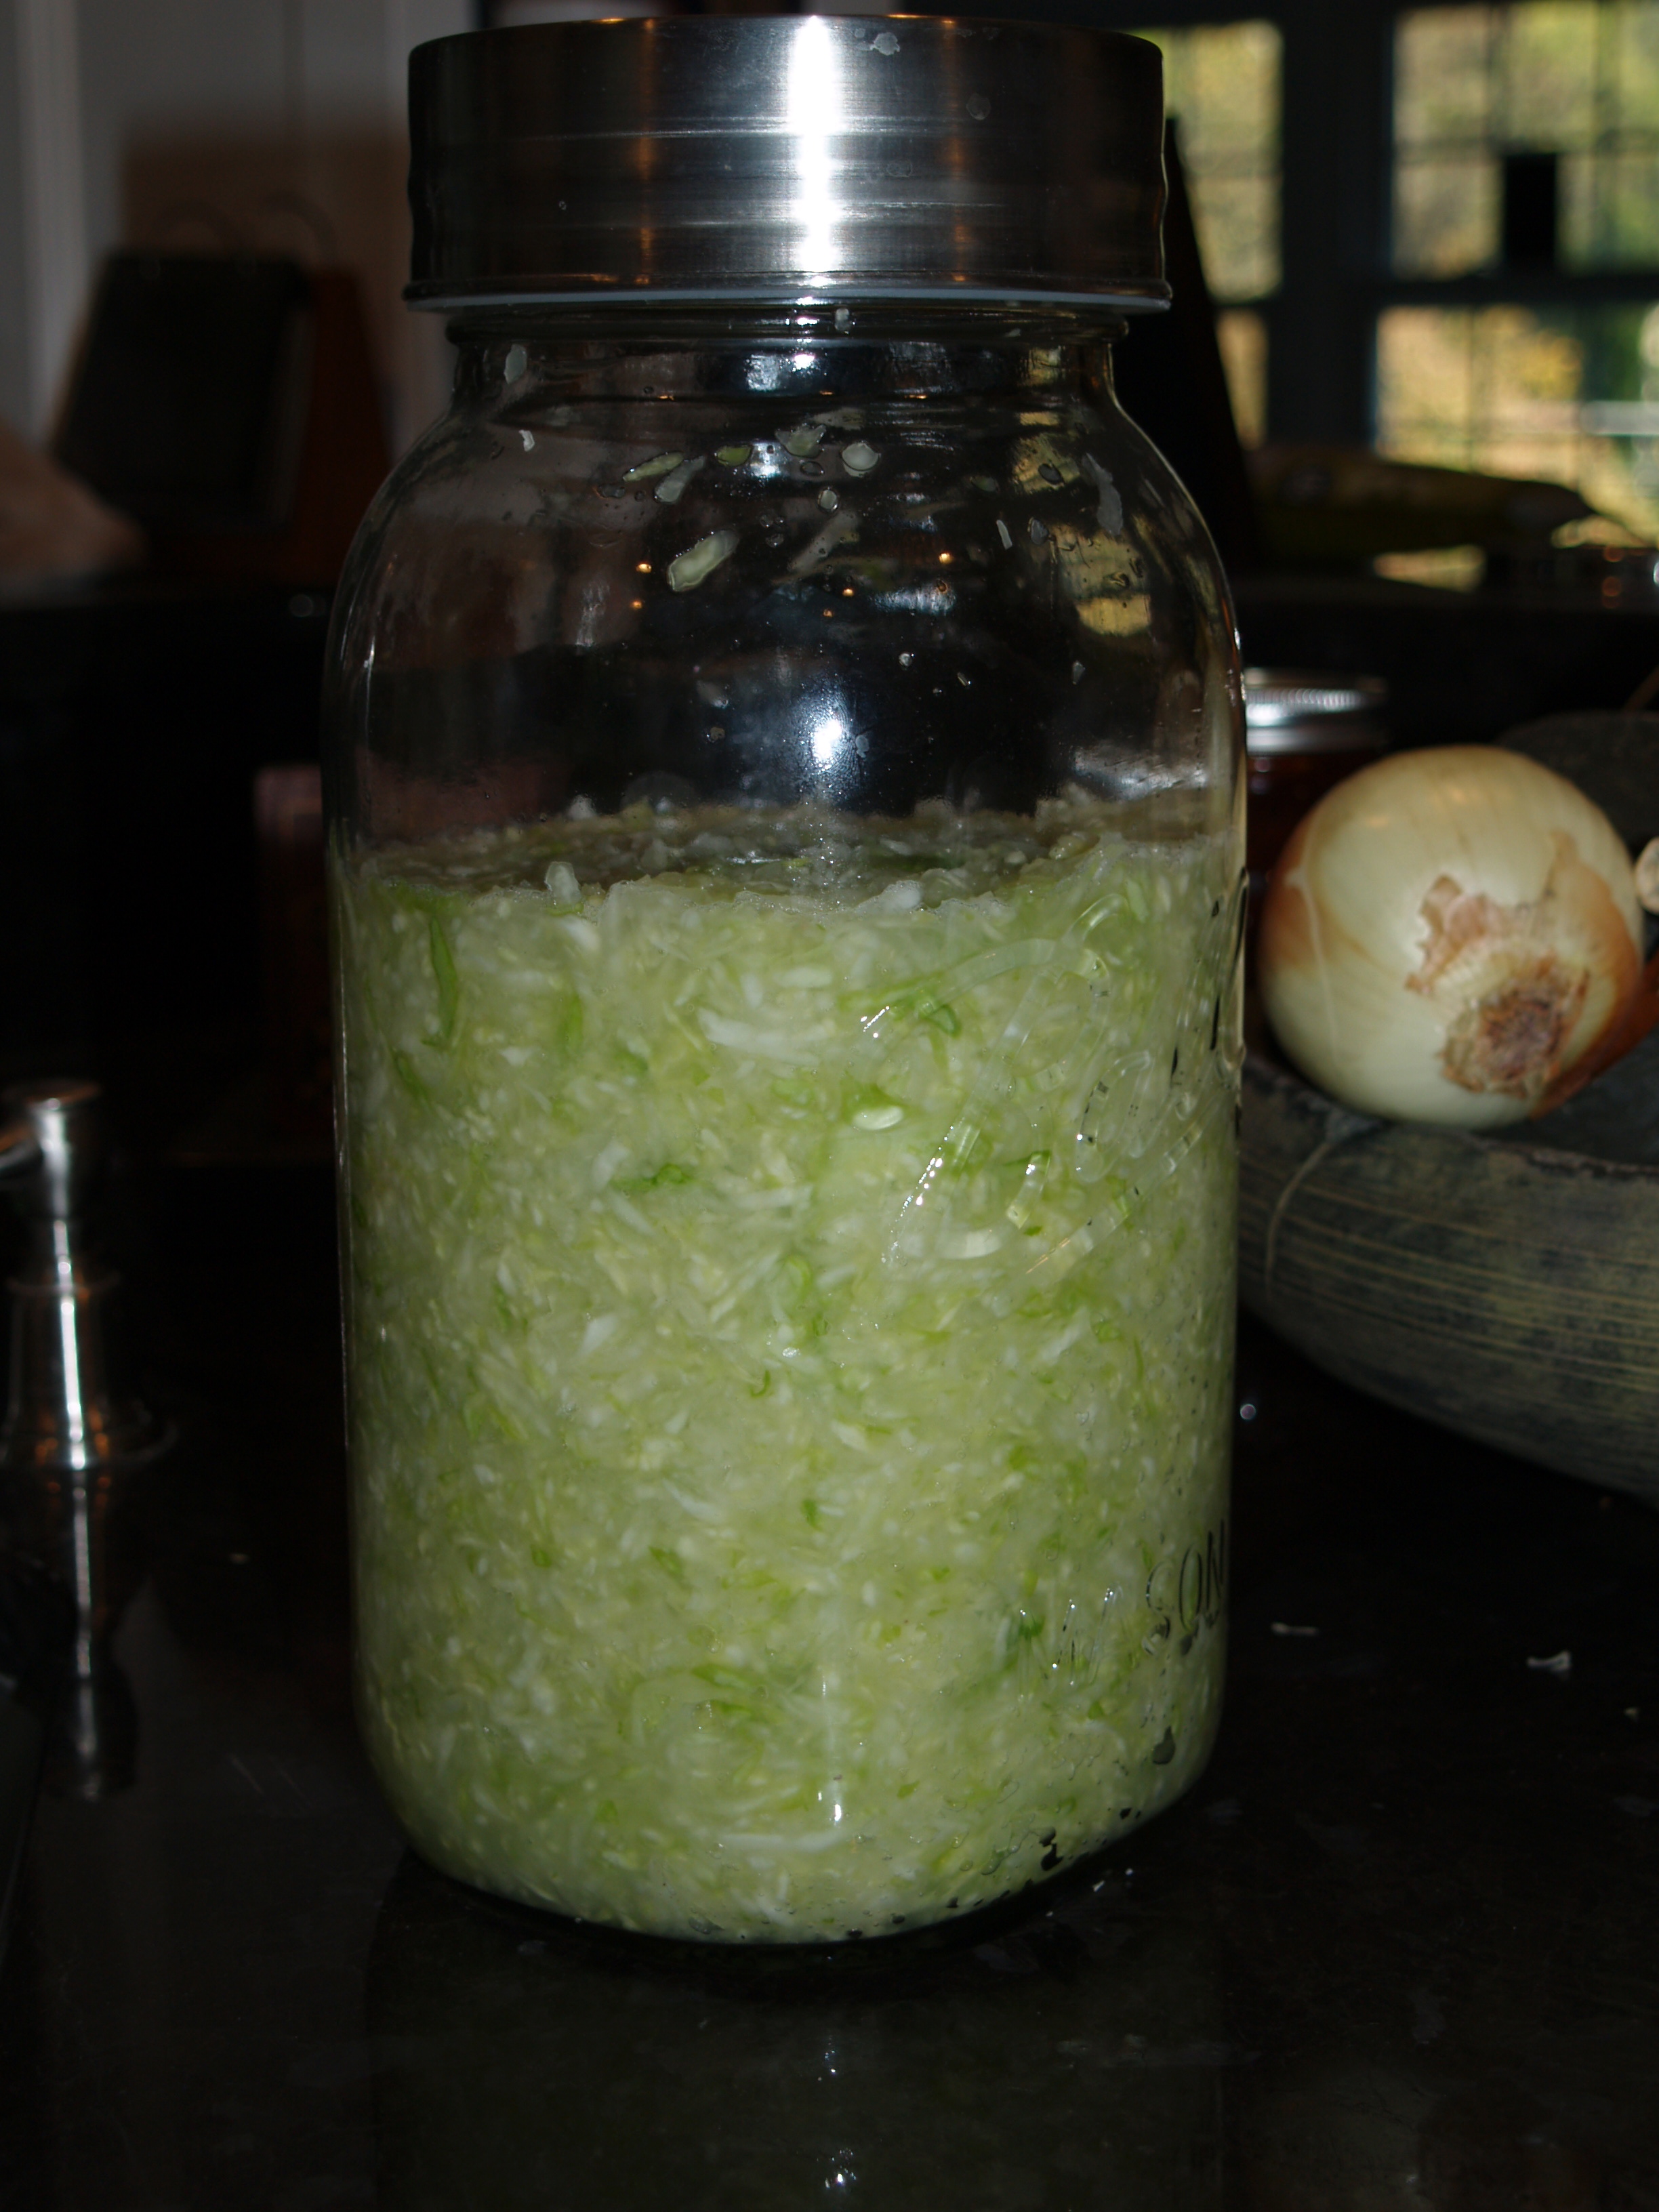
Transfer the mixture to the crock or mason jar.  Tamp it down firmly.  You can use a tamper or your fist.  I use my hands.  Push the cabbage below the brine level.  Fermentation works because the vegetables stay below the brine.  So in this oxygen deprived environment, anaerobic, only the good bacteria are able to survive and thrive.  Place a clean weight over in the crock over the cabbage to keep it down.  This can be a smaller jar with water in it.

To be honest, I do not always use a weight.  My ferments are always on the kitchen counter, so I wash my hands and push it beneath the brine several times a day.  But if you are not able to do that, it’s best to use a weight.


Sauerkraut on the Ferment


The sauerkraut will develop at a rate directly correlated with temperature.  At 45 Fahrenheit, fermentation is very slow, at 90 Fahrenheit it is notably faster.  Lower temperatures, in the 70 Fahrenheit range make a superior kraut.

After 3-5 days, give the sauerkraut a taste.

See if it suits you.  Some people love the flavor of an immature green kraut.  If it’s not the flavor profile you want, let it sit longer for the flavors to develop.  Once it is to your liking, place in smaller jars and move to the refrigerator or other cool spot (like a root cellar).  The slows down the fermentation process.

Taste-testing the developing sauerkraut has become my daughters job and her taste buds are definitely evolving.  We currently have a jar of sauerkraut that has been on the counter for three weeks.  We are using it, but she has not asked to have it moved the fridge.  Surprisingly it has not gotten very very sour, just more delicious.

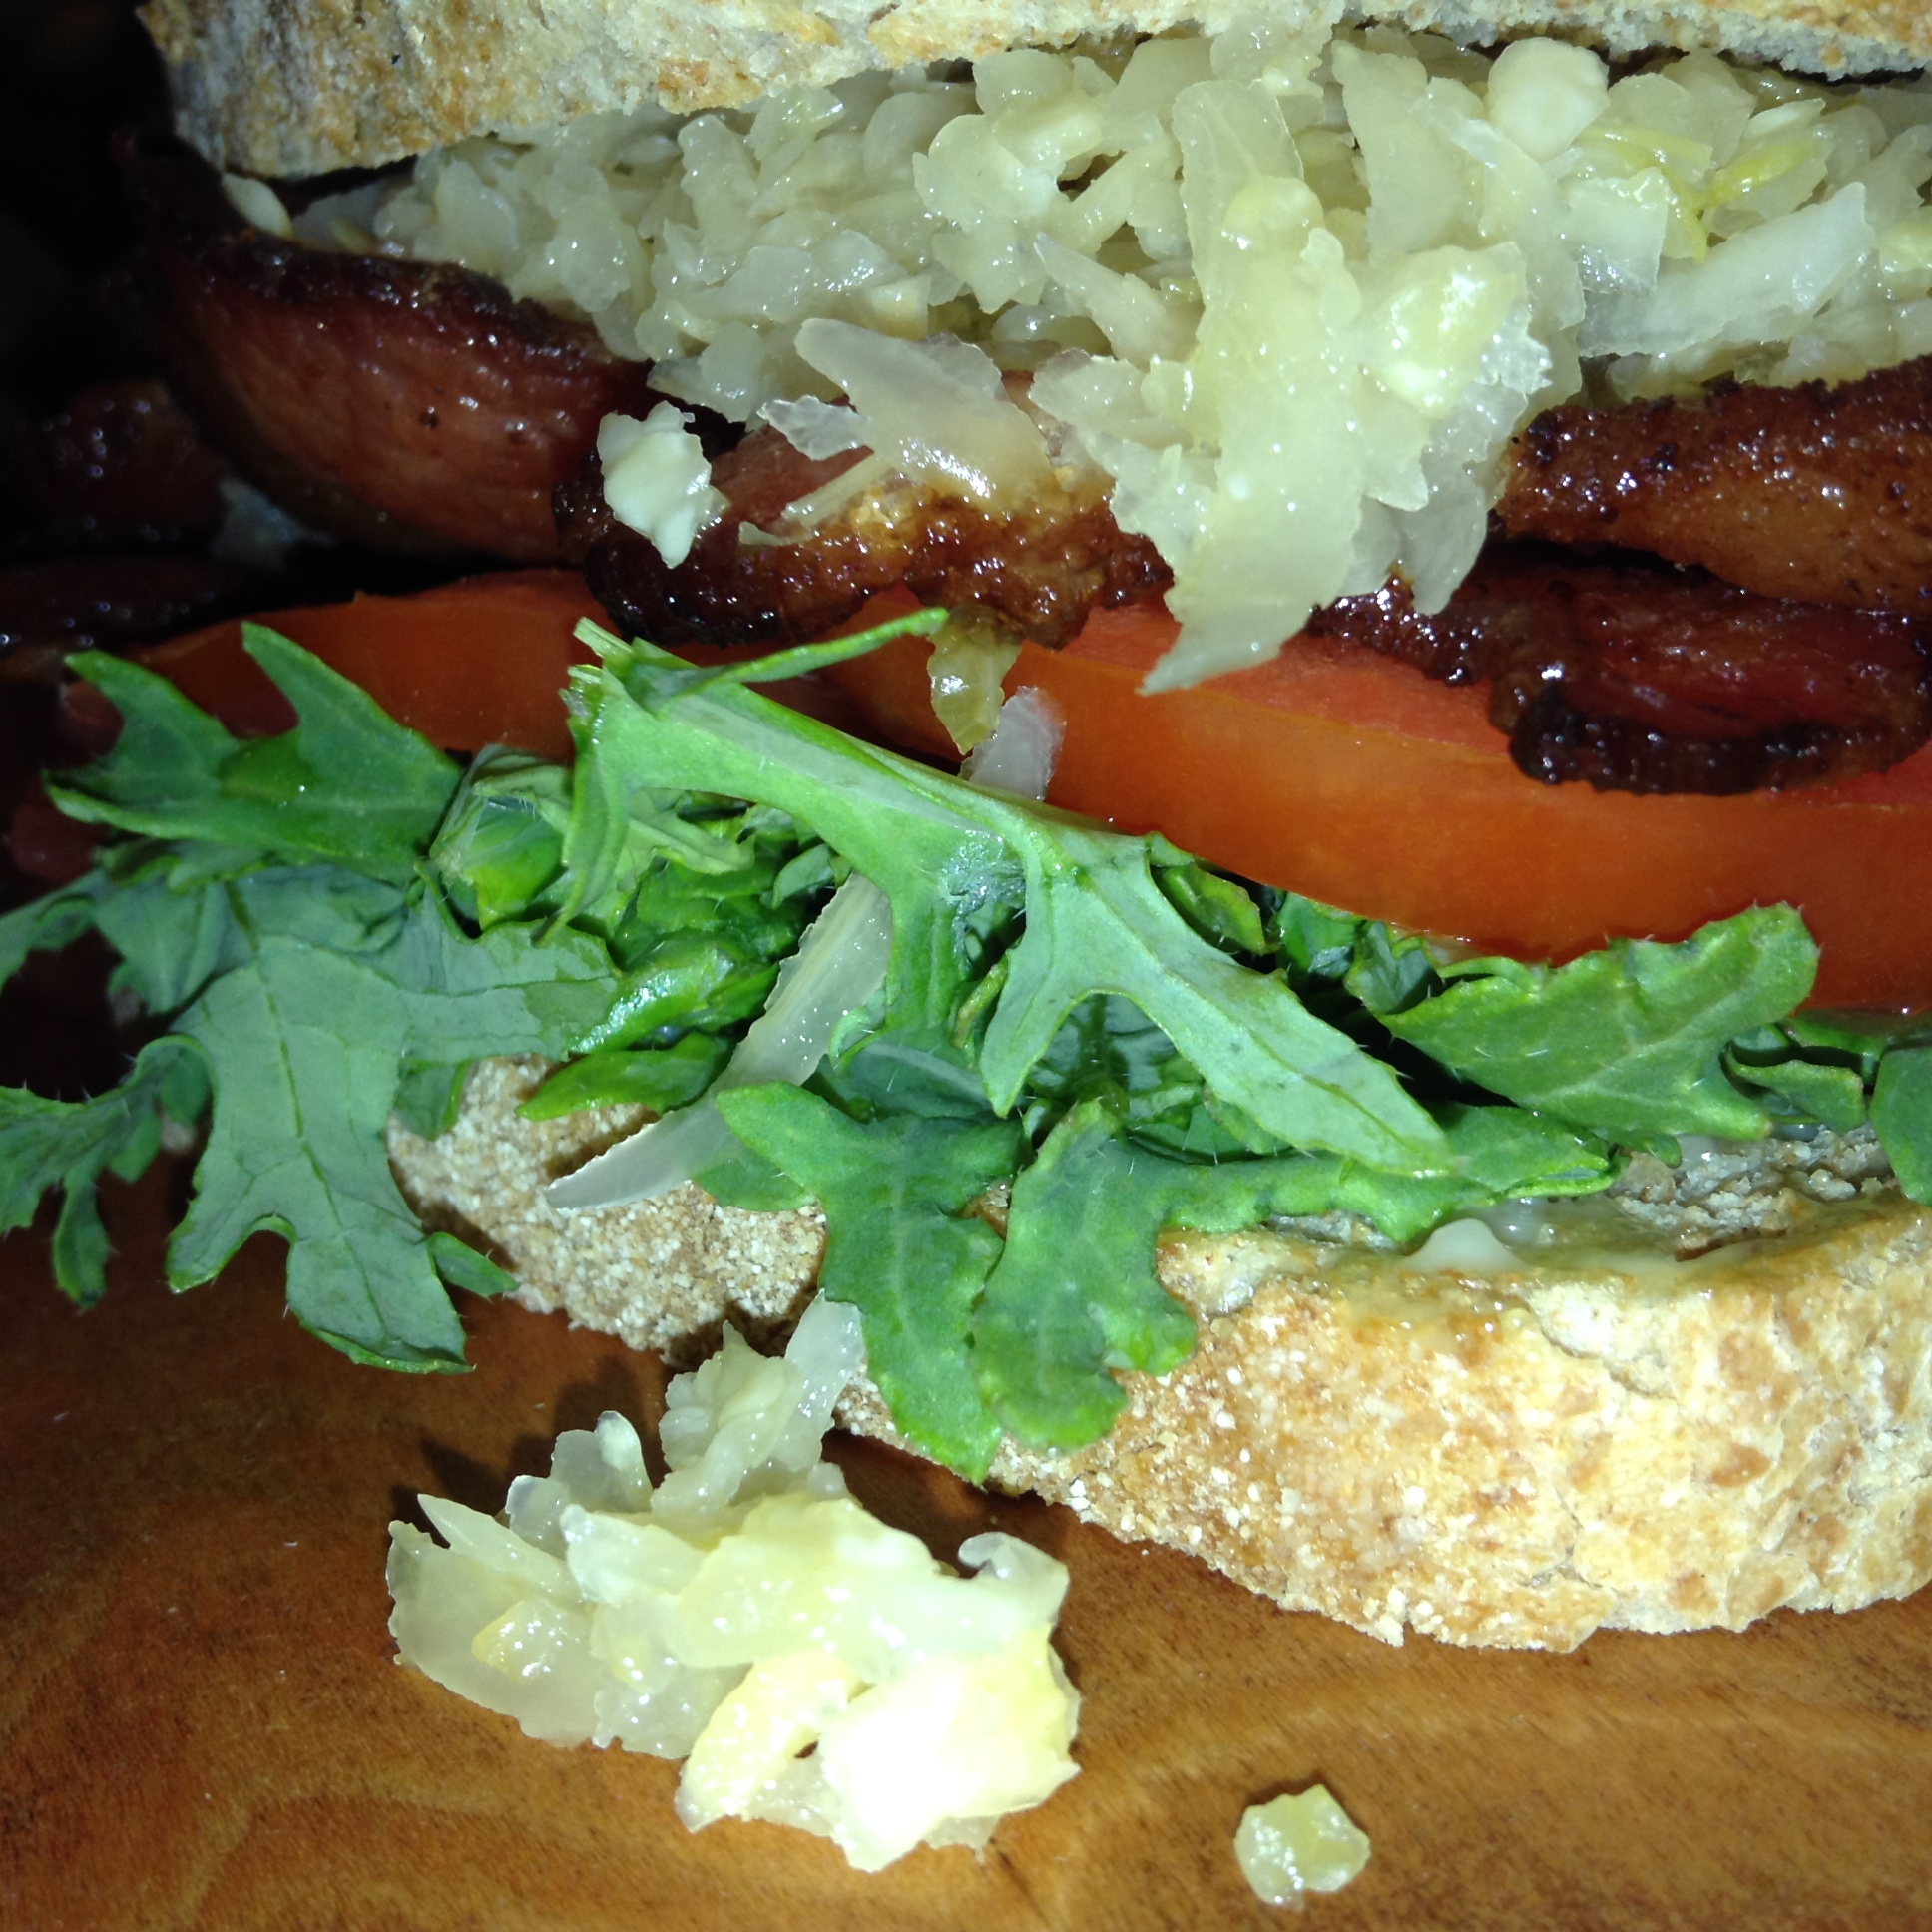
There are many ways to enjoy your kraut, most recently we had ours atop BLT’s served on a great sourdough made during the big snow storm.

sourdough BLT with sauerkraut

sourdough BLT with sauerkraut


Sources:

Katz, Sandor Ellix. The Art of Fermentation: An In-Depth Exploration of Essential Concepts and Processes From Around the World.  White River Junction, VT: Chelsea Green Pub., 2012. Print.

“What Are The Benefits Of Sauerkraut Juice?”. Livestrong.Com

Ten Reasons to Eat Fresh Unpasteurized Sauerkraut | Vitality Magazine | Toronto Canada alternative health, natural medicine and green living


dinner in a pinch : R-amen!

“Our hope is that the winter of humanity will gradually be transformed to the bursting forth of love, for it is to this that we are called.” —Jean Vanier

This is becoming another favorite for the evenings when the kids have activities and we are at a pinch for time.  When I was young we used to LOVE ramen noodles.  My brother and I would come home from school and eat the noodles straight from the pack – without even cooking them!  So, this meal is a trip down memory lane.

Now though, as a student of holistic nutrition, the ingredients in your average store-bought ramen present a major culinary impasse.  We just can’t do the ninety nine cent ramen pack- loaded with MSG and lacking any nutritional value.

It’s important for me to nourish my family well, especially during the cold winter months when it’s all too easy to come down with the flu or a cold .  With all that home made broth we’ve stocked in our pantry, we now have an easy canvas for almost anything we can throw together.  Add to that the mineral richness of stock and bone broth, and your getting a great meal with immune boosting properties.

Recently, I discovered Lotus brand foods.  They have a great and fun selection of ramen noodles, with a short but admirable list of ingredients.  There are individual soups, to which you can just add water, but we really like the big packets of ramen noodles.  There are Millet and Brown Ramen,  Forbidden Rice Ramen made with black rice and Jade Pearl Rice.

Lotus Brand Ramen Noodles

A well stocked pantry makes this an easy weeknight meal.  You’ll need some vegetables of your choice, noodles, seasoning and broth.  This recipe is really a framework for whatever you have on hand.  We make it new every time but this serves as a good guide.  You can use anything you have on hand.


super easy R-AMEN! (serves 4)


ingredients

1 packet Lotus Ramen noodles (4 squares of pressed ramen/ package)

Vegetable of your choice – we used 4 carrots – shredded with a vegetable peeler

a few handfuls greens per bowl- baby spinach, baby kale or even lettuces

6-9 cups chicken, beef, fish or vegetable stock

optional: 1 cup fermented tofu, shredded chicken (we always have leftovers from making broth) or any meat or fish

also optional : wakame seaweed flakes, toasted sesame seeds, sliced green onion, chopped parsley, basil or cilantro, red pepper flakes or hot sauce of your choice     🙂


IMG_0264

Unccoked Jade Pearl Ramen

preparation

place equal amounts of carrot shavings and greens into each bowl  (about a heaping cupful or two for each serving, they will wilt nicely once you place the hot broth into the bowl).   Really, any vegetable is fine, you can just as easily use red or green peppers, tomatoes, thinly sliced cabbage, sliced fresh green beans, bean  or other sprouts – whatever you have on hand!

IMG_0258

greens and vegetables

place ramen noodles and broth into a pot and warm until ramen cooks – about 5 – 10 minutes.  You can also cook the ramen in boiling water.

Ladle ramen noodles and broth distributing evenly between bowls.

IMG_0268

For a variation, top with a spoonful of homemade sauerkraut or kimchee for an extra tang!  YUM!  Fry or poach a pasture raised egg and lay it on top of of your soup if your extra hungry.

Serve with a big side salad and you’ve got an easy weeknight meal!


matzoh ball ~ soup for the soul

IMG_0081

“Real humility is light and buoyant, not weighted down by insecurity, self loathing or an obsession with being known and admired. Humility spends the time and energy freed up by not agonizing over one’s self reveling in the grace of everyday blessings big and small. Humility genuinely rejoices with those who rejoice and weeps with those who weep. Humility retains forever its childlike sense of hope and wonder.” ~ Molly Sabourin

Matzoh ball soup is comfort food at its finest and a great use for your homemade chicken stock!

Food sustains physical life and yet is greater than the nourishment it brings to the table.  Food gathers people  and traditional foods – passed from generation to generation tell a story.  These generational foods – shrouded in history, symbolism and ritual tell the story of peoples and their journeys of life and in that category Matzoh Ball Soup definitely tops the charts.

The Matzoh is probably one of the best known Biblical foods and one that has humbly stood the test of time.  It is a food which tells the story of the exodus of a chosen people and the guiding Hand that frees them from bondage in Egypt.

Matza is unleavened bread –  and one of the three biblical culinary components of the Jewish Passover Seder – it is also called the bread of affliction.  For Jewish families, Matzo is the only type of bread eaten throughout the Passover festival.  The generational story of the matzo is one of slavery and freedom.   The last shared act that every Israelite performed before being freed from slavery in Egypt, as well as the very first act that the entire nation shared as free people at their first stop, was eating matzo. (Encyclopedia of Jewish Food).

The first time my family ever tried matzoh ball soup was last year, visiting grandparents in Florida.  We went their favorite Deli, TooJays  in Orlando.  Such a simple dish, utilizing the most basic and unassertive ingredients – chicken broth, seasonal vegetables, eggs, schmalz (saved chicken fat – from your stock) salt and pepper.  This is quintessential comfort food!

Traditionally, matzo balls are served in a broth only served with carrots – but you can make it your own with whatever favorite vegetables you love!  This recipe doubles and triples nicely!  It also freezes well if you make a big batch.  We portion it into servings for two or four and freeze.  That way it is on hand, ready to thaw, heat and nourish on those busy school nights laden with activities and little time!

Matzoh Ball Soup – it brings nourishing comfort to the body and as the old saying goes – the soul too!


ingredients:

3 eggs

9 cups chicken stock

1/4 cup grated onion

1/2 cup melted chicken fat (Note: Jewish families would not substitute butter as that is prohibited during the Passover.  We used butter (preferably pasture raised).

1/2 teaspoon salt

1/2 teaspoon freshly grated black pepper

1 cup matzo meal (you can make your own by placing Matzo crackers and pulse in food processor or blender.  The other option is to buy it ready to use)

4- 5 diced carrots, sauteed

2 talblespoons chopped parsely  and/or chives (optional)


preparation

Beat the eggs together and 1/2 cup of stock.

IMG_0067

Stir in the grated onion, salt, pepper and fat.

Add the matzo meal.  The dough will be moist.  Cover the mixture and refrigerate for one hour or overnight.


IMG_0073

Shape into matzo balls – about 1 inch in diameter.

Now, you can either heat a pot of salted water or heat your chicken stock (which is a personal preference.)  Drop matzo balls into boiling broth.  The matzo balls will expand and absorb a lot of liquid.  Turn the heat ti medium and let the balls cook for about 30 minutes to set.


IMG_0081

Serve one to two matzo balls with broth and sprinkle with chopped parsley and or chives.


easy almond milk

OLYMPUS DIGITAL CAMERA

“For there is hope of a tree, if it be cut down, that it will sprout again, and that the tender branch thereof will not cease.”  -Job 14.7


Any grain, nut or seed can be sprouted.  The process of germination enhances the food through not only producing vitamin C, but also changing the composition of the nuts or seeds in numerous beneficial ways.

  • Sprouting increases vitamin B content, especially B2, B5 and B6.
  • Just as important, sprouting neutralizes phytates.  Phytic acid is present in all legumes, nuts and seeds and represent a serious problem to our diets.  Phytates inhibit our absorption of minerals such as calcium, magnesium, iron, copper and zinc.  This issue of phytates and their ability to not only interfere with the absorption of the minerals in the almond milk, but also their ability to bind with minerals from our own diets becomes an important one.  Traditional methods of preparing nuts included soaking them.
  • Another benefit of sprouting is that it neutralizes enzyme inhibitors present in nuts and seeds and increases enzyme activity as much as six fold.  Prior to neutralization, these enzyme inhibitors can actually neutralize our own enzymes, the ones found in our digestive tract!

Sprouted almond milk is an item we keep on hand during Fasting periods.  The reason we don’t buy commercial almond milk is due to the fact that industrial methods for producing almond milk do not involve a sprout.  Sprouting takes time and that extra time is money to corporations so it is overlooked.  When one is replacing a staple like milk with nut milk, then large quantities will be consumed and so the issue of phytates becomes very relevant as it can result in depletion of minerals.

Because our diets are seasonal, sprouting almonds becomes part of a 40 day routine when our diets are already changing for the Fast.  It’s easy to incorporate and develop a rhythm to making the nut milk and having an ample supply on hand.  Our family only makes this milk during the Fasts.

Though it takes a few paragraphs to write out the method for sprouting, the active time involved in making the almond milk is about 10 – 15 minutes.  The rest of it really is left up to the almonds and time.


Easy Almond Milk

First for the Sprouting

  • 1 cup rinsed almonds
  • 3 – 4 cups cool water
  • bowl

Method

Place almonds in bowl and pour in water to cover by at least one inch.  Allow almonds to soak for 4-12 hours.

Rinse and drain.  Place almonds in sprouting jar or mason jar and put out of direct sunlight at room temperature.  Let sit for 8-12 hours.  Rinse and drain and you can use them.

The almonds will have a bulge to them.   These are more soaked than sprouted.  Now you can make your almond milk.

OLYMPUS DIGITAL CAMERA

For the almond milk.

  • 1 cup soaked almonds
  • 1 or 2 nut milk bags for draining
  • 2 cups water
  • blender
  • optional: 1/4 tspn pure vanilla extract
  • t tspn raw honey or sweetener of your choice (quantity may vary to taste)

Place almonds and water in blender.  Start out on low speed and increase speed to medium for 1-2 minutes.  All chunks of almond should be gone.  Place nut bags over bowl and pour in the almond milk.  Strain the milk through the bag.

The remaining almond meat can be used for other recipes or placed in a mason jar in freezer until you are ready to use.  The almond meal be stored in the freezer for 2 months.

We normally double or triple the recipe to make a good portion of the almond milk for the week.  The almond milk will separate in the fridge, but that is okay.  Just give it a good shake or stir before enjoying!

During Fasting periods we use it in chai, smoothies, and oatmeal as a staple ingredient.


OLYMPUS DIGITAL CAMERA


fish broth

OLYMPUS DIGITAL CAMERA

“The proof of love is in the works. Where love exists, it does great things. But where it ceases to act, it ceases to exist.” —Saint Gregory the Great


This is a simple fish broth and it’s also a very inexpensive one too.   In fact, fish broth can be the least expensive for you to make.  Just make a call to your local fish monger or supermarket and ask them to put aside any carcasses for you from the day.  Chances are they’ll charge you 50 cents to a dollar for it, or just let you have them for free!  For vegetarians, this is a great way to add the benefits of bone broth in to your diet.

Fish broth has a delicate flavor but strong smell when it is cooking.

It’s a good idea to avoid the larger fish when making broth – this is due to the probable build up of mercury in the larger varieties like tuna.


Ingredients:

  • 2 medium fish carcasses or several fish heads – such as  rockfish, snapper, or turbot
  • 1 small head celery
  • 1 medium onion cut into fourths
  • 2 carrots
  • 1 small head garlic, washed, not peeled but cut in half
  • 1 teaspoon black pepper corns
  • 3 quarts cold water
  • juice of one lemon

Place all ingredients except lemon in stock pot.  Bring to boil and skim.  Simmer covered for 3 hours.  Remove from heat, strain add the juice of the lemon and use or store.  It is important not too cook with the lemon, but add it at the end as if you cook with the lemon that will impart a bitter flavor to the soup.


simply beef broth

“When you sit down to eat a meal it should be a time for pleasure and warmth, family and friends.  Food should be enjoyed.  Even more importantly, it should also be nourishment that meets your bodies needs… in these times the food supply is plentiful but it lacks the bodies needs.”  Tom Valentine-Search for Health

In days of old, families went to the butcher for meat on the bone, rather than prepackaged cellophane wrapped individual filets.  Our prudent forefathers then made use of every part of the animal by preparing stock or broth from the bony portions.  This beef broth is simple to make, and like chicken, fish and vegetable broth it is very very nourishing.

The “rest” of the animal is commonly known as offal (not awful!).  Most of the meat we eat is only a small portion of the animal, pieces like steaks and chops and tenderloin.  Offal are pieces like the neck, shank and tail and bones and used to be the pieces we enjoyed and relished but now no longer appreciate.  What were once the choice cuts such as the tenderloin and New York strip were expensive and actually special; but thanks to industrial farming these once pricey portions are now very cheap, and so we have forgotten about the rest of the animal.

In the sense of pastoral eating, using the other parts of the animal is a way of honoring that animals sacrifice for our table.

A note on sourcing your ingredients:  A butcher or local farmer that is a great place to start when sourcing your meat, mainly because they can answer your questions about what it was fed and how it was raised.  How an animal is raised, fed, slaughtered and aged are important factors to consider when purchasing your meat ~ and these factors are not easily determined when looking at a final product.  A cow is a ruminant animal that is going to be healthier when raised on the grasses for which it’s ruminant digestive system was created.  There is ample evidence that corn and grain weakens the health of an animal as well as increasing the amount of fat and changing it’s composition to contain a much higher ratio of omega-6 to omega-3 fatty acids.

The addition of the vinegar in the recipe below increases the mineral content of the final stock.


Simply Beef Broth

Ingredients:

  • 1 large onion, rinsed and unpeeled, cut into wedges
  • 3 carrots, sliced
  • 3 stalks celery sliced
  • 1 leek, washed and cut – both white and green parts
  • 4 pounds mixed beef bones and odd bits
  • 4 or more quarts cold water
  • 1-2 tomatoes halved
  • 1 medium head garlic, rinsed and cut in half
  • 3 sprigs thyme, rosemary or combination
  • 1 fresh bay leaf (you may use dried)
  • 1/2 teaspoon black peppercorns
  • 1/4 cup apple cider vinegar

Preparation:

Place bones and odd bits in heavy stock pot – enamel coated cast iron or stainless steel are best.  Saute on low heat to brown on all sides (about 30 minutes).  Add vegetables, vinegar and water.  Bring to a boil.  Cover, reduce to simmer and cook for 12 to 24 hours.  If necessary, add more water to cover the bones.

While it is cooking, check it periodically, skim off anything with a spoon that rises to the surface.

Strain.  Discard bones and compost vegetables.

This stock is the base for many wonderful soups.

OLYMPUS DIGITAL CAMERA


vegetable . mineral . broth

Vegetable Mineral Broth

“Solitude, prayer, love and abstinence are the four wheels of the vehicle that carries our spirit heavenward.”  

Saint Seraphim of Sarov

Vegetarian cooking, for both health and spiritual reasons, has been rediscovered and has attained wide prominence.  In the cooking at monasteries, this goes a long way toward sustaining and encouraging the positive trend we see today.  Besides, a vegetarian meal— when well prepared and attractively presented at the monastic table— has a charm all its own.  I am sure the same can be said of other vegetarian tables around the country and around the world.”  (Brother Victor-Antione d’Avila Latrourette)

This broth is a fasting staple in our home, and when the seasons of the Fasts approach we double and triple this recipe into mason jars in order to have ample stock on hand.  It simplifies our Lenten meal preparation, and as you can imagine, that is a great blessing!

In this age of take out and hurried cooking making your own stock may seem like a bother, but your meals will have greater flavor and nourishment if you do!

The preparation of this nourishing mineral rich broth requires no fancy equipment or culinary skills.  It is a recipe we appreciate for it’s ease of simplicity, wholesome monkish frugality and great flavor.  All the ingredients are very rough chopped into large chunks, and allowed to simmer for a few hours.  The result is a sweet tasting, aromatic broth.  It’s just that easy.

Vegetable stocks tend to have less body and texture due to the lack of gelatin and fat, but with the combination of sweet potatoes, garlic and leeks, this broth is unapologetic fresh, nourishing and delicious.  The addition of the kombu adds valuable trace minerals to this exceptional vegetable broth.  (Kombu is available in the asian section of most grocery stores.)

We load our pantry with this mineral broth during fasting seasons and it is the base for almost everything we cook from rice, to lentil soup to minestrone.

This recipe is inspired and adapted from The Cancer Fighting Kitchen : Nourishing Big-Flavor Recipes for Cancer Treatment and Recovery by Rebecca Katz who says, “This rejuvenating liquid, chock-full of magnesium, potassium, and sodium, allows the body to refresh and restore itself.”


Vegetable . Mineral . Broth

Ingredients

As always, source the best ingredients available and affordable to you.  Organic is the best option since this recipe calls for the peels of the vegetables – since that is where many minerals reside, but it is also where pesticide residues can be found.

  • 1 pound unpeeled carrots, cut into thirds
  • 1 unpeeled yellow onion, cut into chunks
  • 1 unpeeled red onion, cut into chunks
  • 2 leeks, white and green parts, cut into thirds
  • 1 bunch celery, including the heart, cut into thirds
  • 4 unpeeled red potatoes, quartered
  • 3 unpeeled sweet potatoes, quartered
  • 1 unpeeled garnet yam, quartered
  • 1 head garlic, halved
  • 1 bunch fresh flat-leaf parsley
  • 1 8-inch strip of kombu or Nori
  • 10 black peppercorns
  • 4 whole allspice or juniper berries
  • 1 bay leaf
  • 8 quarts cold, unfiltered water 1 teaspoon sea salt (to taste)

 Preparation

Rinse all of the vegetables well, including the kombu. In a 12-quart or larger stockpot, combine all of the ingredients with the water (2 inches below the rim), cover, and bring to a boil.

Decrease the heat to low, and simmer, for about least 2 hours. As the broth simmers, some of the water will evaporate; add more if the vegetables begin to peek out. Simmer until the full richness of the vegetables can be tasted. Strain the broth through a large, coarse-mesh sieve add salt to taste. The strained solids can be composted.

Let cool to room temperature before refrigerating or freezing.

You can drink this warm from a cup like tea or use it as the base for soups and rice.


chicken broth

“Soup puts the heart at ease, calms down the violence of hunger, eliminates the tension of the day, and awakens and refines the appetite.”  Auguste Escoffier

“Soup is the song of the hearth…  and the home.”

Louis P. De Gouy, ‘The Soup Book’ (1949)

Homemade chicken soup: it’s not only good for the soul but also the flu!  A warm bowl of it contains rejuvenating nutrients and proteins that may otherwise be difficult for a flu ridden and nauseous stomach to digest.

Whether you find you like to make large batches, or enjoy simmering a pot every few days, you’ll need a large stock pot with a lid. Stainless steel and enameled cast iron are very good choices.

A word on ingredients.  Find and use the best ingredients affordable to you.  Bones and carcasses from free range pastured animals are the gold standard, which we’ll talk about in an upcoming post.

Remember, eating healthy broth need not be an expensive endeavor.  Our farmer sells pastured beef bones for $1.00/lb and chicken carcasses for $2.00/lb.   That’s a great deal!  Despite being carcasses they are absolutely loaded with meat and frankly it’s enough for our soups and stews – no need to add any extra.


Basic Chicken Broth / Stock

  • 1 whole free range chicken, or 1 organic chicken carcass or 2-3 pounds chicken parts i.e  chicken feet, necks or scraps
  • 1 large onion quartered
  • 1 head garlic, rinsed and cut in half
  • 3 celery stalks coarsely chopped
  • 2 washed, unpeeled sweet potatoes or yams, cut into thirds
  • 4 carrots coarsely chopped
  • 1 strip kombu –  optional : this is a great source of potassium and iodine and minerals
  • 12 or so black peppercorns
  • 1 or two bay leaves or several generous sprigs of any fresh herbs you have on hand, thyme, sage, oregano are great
  • 1 tablespoon apple cider vinegar (this acidity allows more minerals to leech from the bones)
  • 1 teaspoon sea salt


Rinse all vegetables well.  Place chicken, carcass or parts in a 12-quart or larger stock pot.  Brown on low heat briefly on all sides.  Add vegetables and herbs and fill pot with cold water, about two inches below the rim.  Add vinegar or lemon juice.  Bring to a boil.  Remove the lid, decrease to low heat and simmer for at least two hours.  Some of the water will evaporate.

Strain broth through a coarse sieve.  Cool to room temperature before refrigerating or freezing.    Will store in refrigerator for 5 to 7 days or in the freezer for 4 months.

Once cool, the fat will separate to the top, you can remove this and use it for other purposes.